Search

Case Study:

Flexible Production Test Software Design

Flexible Production Test Software Design

Commercial Design | Software Design

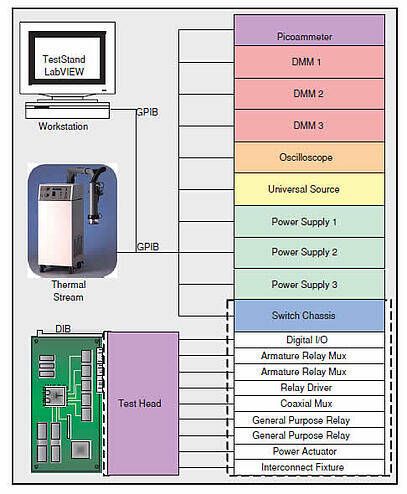
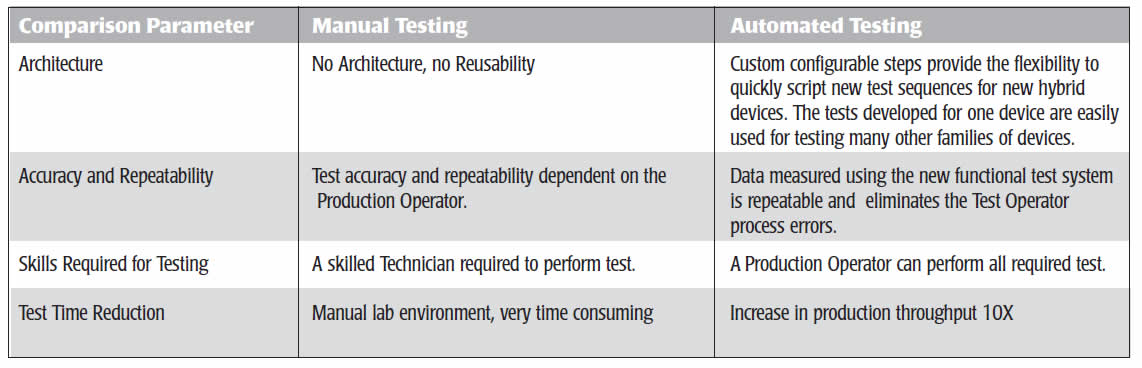
The challenge with designing a flexible production test system is providing a software architecture that allows for quick test application development for a variety of products. To address this challenge, G Systems used NI TestStand and LabVIEW test sequences developed for one product and easily migrated those test sequences to support the development of many new products.


Challenge

Design and implement a custom functional test system to produce many different types of semiconductor hybrid products. The system needed a flexible test architecture, easy-to-use development environment, intuitive production graphical user interface (GUI), instrument and product interchangeability, reduced maintenance cost, and the ability to archive product test data.

By abstracting the instrument drivers and building configurable step types in NI TestStand, the system can support a variety of test hardware configurations and dynamic configuration of test parameters. The result was a flexible production test system that meets the ever-changing requirements of today’s manufacturing environment.

Solution

G Systems created a custom test executive with user-configurable step types. This architecture provides the user with a flexible method to quickly assemble and configure new custom test sequences, which allows production testing of many different families of hybrid semiconductor components. They also used the NI TestStand executive to execute the test sequences, perform test step pass/fail evaluation, and archive the final test results for future analysis.


Overview


This project involved replacing the manual process of testing hybrid components using bench instruments with an automated test system. For this system, we selected NI TestStand and LabVIEW software as well as computer-based automated test equipment (ATE) as shown in Figure 1.

blank

Figure 1: Test System Hardware Block Diagram


Software Architecture


The major components of the software architecture implemented by G Systems are shown in Figure 2. These components include the instrument abstraction layer, configurable instrument layer, sequence editor, NI TestStand engine, process model, and GUI.

blank

Figure 2: Software Component Architecture using NI TestStand and LabVIEW


Instrument Abstraction


The instrument abstraction layer consists of several instrument classes for instrument interchangeability. Interchangeable virtual instrument (IVI) classes and drivers are employed. Where IVI drivers do

not exist, a “wrapper” class calls existing plug-and- play instrument drivers, and abstracts instrument functionality for each class. The instrument classes automatically detect hardware models and provide a high-level interface for seamless code integration.

The configuration file structure provides instrument ID extraction through the instrument’s name (e.g., [DMM1], [PS1]). System instruments can be configured without modifying the low-level code by simply editing the configuration file. The instrument manager VI is the core component for instrument communication. All the instrument information is stored in the instrument manager’s internal cache shift registers.


Configuration Test Steps


The configurable test step enables the user to configure test parameters during sequence editing without additional programming. Configurable test steps provide the user with a GUI to configure the test parameters. When the user configures a test step they can set test parameters while visualizing how those parameters affect the pass/fail test status. Figure 3 shows the configurable instruments and test step types selection from the menu.

Custom configurable steps were built for each instrument. Based on the test plan, several configurable test step types were developed for performing measurements. These custom configurable steps give the user the flexibility to script new test sequences for testing hybrid circuits.

blank

Figure 3: Custom Configuration Step Types


Sequence Editor


For debugging and testing a new unit under test (UUT) model, the test engineer or technician uses the NI TestStand Sequence Editor (Figure 4) to execute the test sequence and process model. The Sequence Editor is easy to use during new product development because it offers the flexibility to change test parameters, modify execution flow, and view watch variables in a debug mode.

blank

Figure 4: The Sequence Editor


NI TestStand Engine


The Active X GUI controls the NI TestStand engine for loading sequence files and executing tests, and it provides centralized run-time memory space for shared data. Using NI TestStand API calls (UI messages), data is transferred between NI TestStand and the custom operator interface. The NI TestStand property loader loads the test limits and parameters based on the temperature at which the component is being tested.


Process Model


The test system process model behavior is subdivided into five main subsequences. During Model PreUUTLoop, the process model identifies, initializes, and configures each instrument. Model PreUUT sets the temperature, makes the connections to the UUT, and performs the recurring initialization tasks. MainSequence performs the main sequence of test steps while evaluating results against test limits. Model PostUUT increments the temperature index and is called during shutdown to close instrument handles and perform other necessary shutdown functions.


Process Model Post Results List Entry


In this call back, data saving is implemented. This call back is triggered only when the main step “record results property” is enabled. A precondition is set to log the data when the data logging function is enabled and the step type is a custom numeric limit or a pass/fail test.


Configuration Entry Point


The Configuration Entry Point is a LabVIEW GUI that allows the user to enter the part and lot number, limit file and data saving directory paths, test temperature selection to be executed, and the data saving enable-disable option.


The Graphical User Interface and Performance Measurements


G Systems developed a custom GUI using LabVIEW to display information important to the customer (Figure 5).

Many of the hybrid test system component sections were tested for proper functionality at different temperatures by the ATE system. Specific measurements included reference, oscillator, output, error amplifier, pulse-width modulation, under voltage lock out, and soft start section testing.

blank

Figure 5 : LabVIEW Test Executive GUI

blank

Table 1: System Performance Comparison for Manual vs. Automated Testing

Some of the specific tests that can be performed include measuring the input bias/offset current and voltages, common mode rejection ratio, power supply rejection ratio, clock high and low, thresholds, rise time, fall time, TON, and TOFF. An example of a configurable measurement step is shown in Figure 6.

blank

Figure 6: Configurable Measurement Step

“This custom system solution saved our customer more than $100,000 compared to buying an entry-level commercially available mixed signal tester.”

blank

Results

Using NI TestStand and LabVIEW software, G Systems engineers quickly created a user-configurable hybrid semiconductor functional test system. This custom system solution saved our customer more than $100,000 compared to buying an entry-level commercially available mixed signal tester. The system greatly reduces the product test cycle time versus the previous method of manual test. The system also provides a flexible test architecture, easy-to-use development environment, intuitive production GUI, instrument and product interchangeability, custom configurable instruments and test steps, reduced maintenance costs, and the ability to archive product test data.

Ready to Get Started?

The best way to begin is by having a conversation with a member of the G Systems teams about your test challenges and the options for helping you solve them.

Hidden
Hidden
Name(Required)
This field is for validation purposes and should be left unchanged.