A test is only as useful as the results it produces. Comprehensive National Instruments’ TestStand sequences may generate reports that are hundreds of pages long. This blog examines the default NI TestStand reports and demonstrate several simple steps G Systems has perfected to convert your encyclopedic report into something concise and easy-to-read.
To begin, let’s examine the default XML report generated simply by running a Single Pass execution of a new test and measurement sequence.
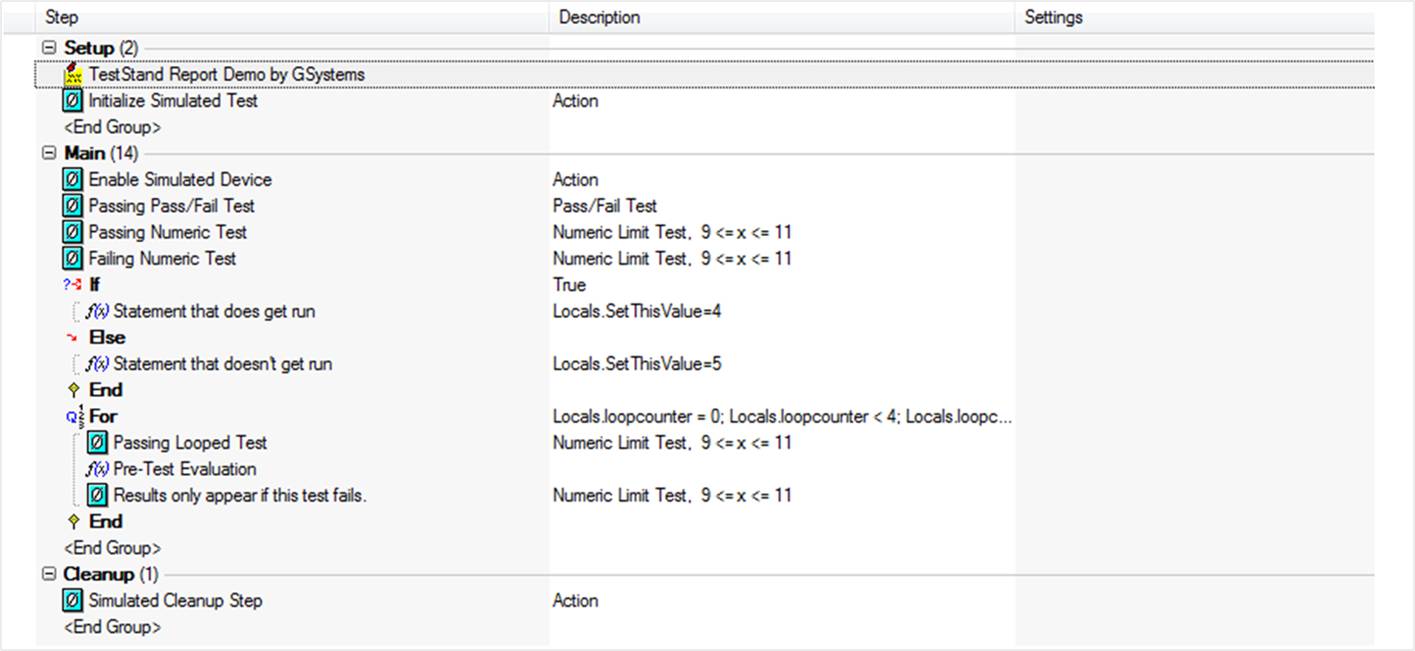
Here is the demo sequence we will be using:

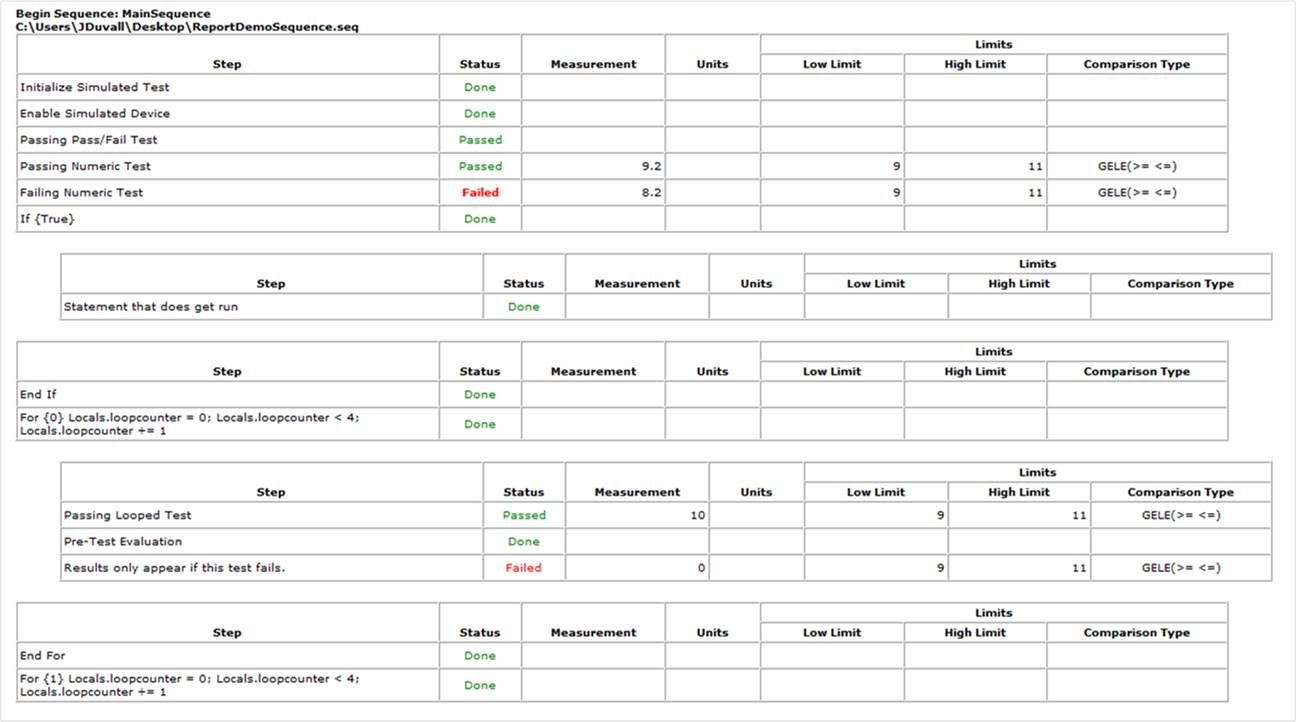
The report we get from running this test is shown in part below:

The first thing you might notice is that this looks fairly cluttered. In this segment we have 14 reported items, only five of which are results. In some cases it may be desirable to have this level of detail, but it reduces readability.
The first and easiest way to effect dramatic change in your report is to disable all reporting and turn on reporting only for particular line items of interest.
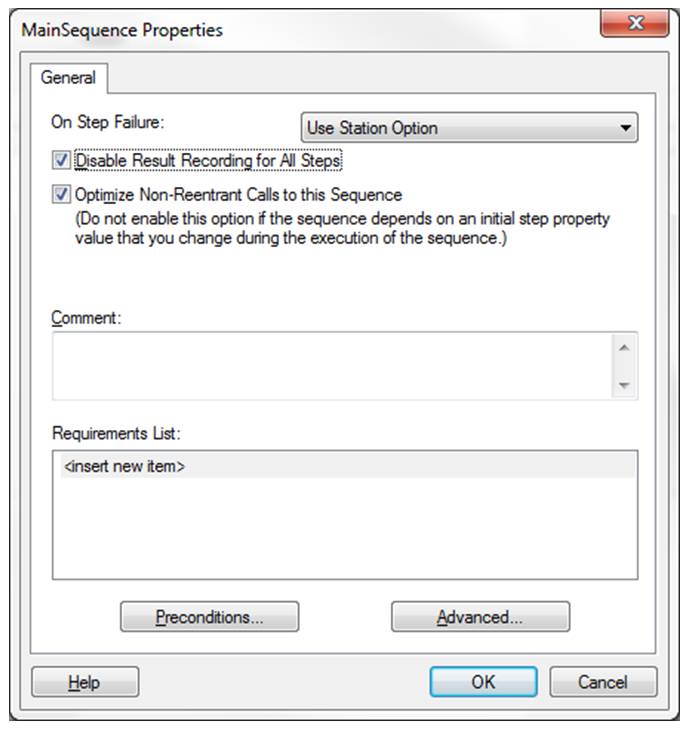
The easiest way to disable all reporting is to do it on the sequence level. To do this, select Edit >> Sequence Properties and then enable the “Disable Result Recording for All Steps” option, as shown below.

This method is preferable over manually disabling reporting in each individual step as it is faster, broad-sweeping, and does not clutter the sequence file view with numerous, useless Result Recording- Disabled notifications.
Now that recording is disabled for all steps on the sequence level, we’ll want to override this on our steps of interest.

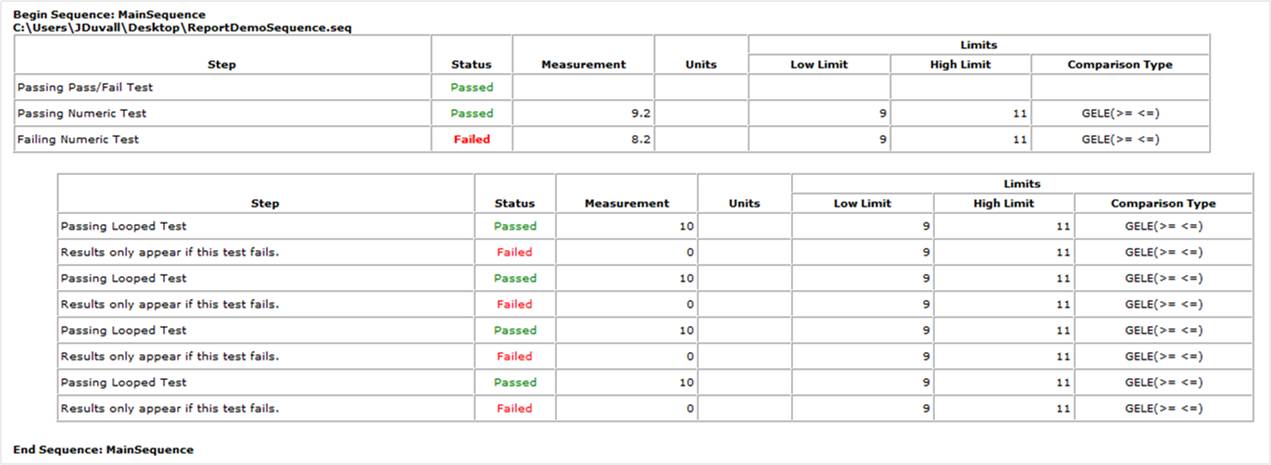
Now the report is considerably cleaner.

Notice that all of the action steps, the ifs, end-ifs, and loop information are now purged from the report. In fact, the entire report now fits in a quarter of the space.
This is not all that can be done though. In this case, our loop has two tests in it. The first is called “Passing Looped Test” and the second is called “Results only appear if this test fails.” The test is set to always fail, so this self-descriptive title is true. However, if one of them passed, it would still also be shown.
What we’re going to do next is change the way a step is reported on-the-fly. The usefulness of this is largely in diagnostics. For clarity’s sake I’m going to adjust the two test steps to a real-world situation.

Here is our modified For Loop.
What we’re doing here is checking to make sure that the current through our test device never exceeds 200 mA. There’s a problem with performing only that test though, as it can pass in the disconnected condition. If we’ve got a problem with a connection pin or our cable is completely disconnected, 0 V will be applied to the circuit under test and that’s going to mean less than 200 mA. So, we’ll also check the validity of the test by making sure that the measured voltage provided by the power supply to our circuit is about 10 V.

Here are our new results, configured to simulate a disconnected pin on the third loop. It is important to include this Power Supply Output check because philosophically, the test sequence is not sound if it can produce a “Passed” Result as the summary result with a disconnected pin. Checking that the Power Supply was actually providing voltage accounts for this requirement. However, let’s suppose that this Power Supply reading is superfluous nearly all of the time. It isn’t relevant to the actual UUT so we don’t want it in the report unless it is alerting us of a problem with the test run.
No problem, we’ll just turn it off. This is actually a little more complicated than you might expect, as you must set the Result Recording Option before the step begins execution. If you try to reset it during the step by checking the Step Results parameter, you will be too late. Instead you must perform the evaluation in a prior step. I usually do this with a statement step set to not record results. This step will perform the same evaluation as the upcoming step but will use the result to determine if the following step will record its outcome or not.

This is the reason for the Pre-Test Evaluation step shown above. The formula I used:
RunState.NextStep.ResultRecordingOption= (Locals.loopcounter == 2 ? 2:0)
The next formula is to set the Result Recording Option of the very next step in the sequence to be either 2 or 0. 2, which corresponds to the override sequence setting value we’ve been using and 0 corresponds to disabled. In this example I simply used the variable driving the For Loop to cause a fail on the 3rd loop. Normally this evaluation will use the limits and value of the step that follows.
Our new, cleaner results are:

It might be a requirement to use an action step with an attached code module in your Pre-Test Evaluation. If this is the case, simply save the value you’re evaluating into the Step. Result local as usual and then reference that value in the step that will actually record the data.
Finally, view our cleaned-up report:

The Result?
Our several-page report is now reduced to eight entries, all of which are pertinent. The process outlined above equates to a lower-risk test, more accurate results and time saved.
Contact Us if you’re interested in learning how G Systems can help with your NI TestStand reporting or other automation testing tools. G Systems is an NI Gold Alliance Partner, and 2016 NI Regional Partner of the Year – Americas.


